Scaling Applications with Azure Redis and Machine Learning
This article presents design best practices and code examples for implementing the Azure Redis Cache and tuning the performance of ASP.NET MVC applications, optimising cache hit ratio and reducing “miss rate” with smart algorithms processed by Machine Learning.
In a multi-tier application, bottlenecks may occur at any of the connection points between two tiers: business logic and data access layers, client and service layers, presentation and storage layers, etc. Large-scale applications benefit of various levels of caching of information for improving performance and increasing scalability. Caching can be configured in memory or on some more permanent form of storage, in different size and in diverse geographic locations. The open source Redis engine, as implemented in Azure, allows for an intuitive configuration of management of all these aspects, and utilisation from a variety of programming languages.
This article, in two parts, presents design best practices and code examples for implementing the Azure Redis Cache and tuning the performance of ASP.NET MVC applications, optimising cache hit ratio and reducing “miss rate” with smart algorithms processed by Machine Learning.
Azure Redis Cache
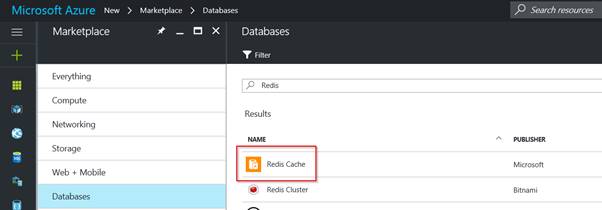
Let’s start by saying that Redis Cache is not a Microsoft product. Redis is an open source project freely available for download from the web site redis.io. Anybody can download the cache engine and install it on their own servers. Microsoft, though, offers this – and much more – as a service in Azure. You can simply create a new Redis Cache instance in Azure in a few minutes, and be ready to connect to it from your application.

Creating a Redis Cache in Azure
What makes Redis different from other caching frameworks is its support for specialised data types, besides the typical key-value string pair, common in other cache engine implementations. You can run atomic operations on these types, like appending to a string, incrementing the value in a hash, pushing an element to a list, computing set intersection, union, difference, or getting the member with highest ranking in a sorted set.
From an operational perspective, the Redis implementation in Azure allows replicating cache instances in a two-node Primary/Secondary configuration, entirely managed by Microsoft. Redis also supports master-subordinate replication, with very fast non-blocking first synchronisation, auto-reconnection on net split and so forth. Just to expand on the replication feature, which for me is absolutely a differentiation point:
· Redis replication is non-blocking on the master side. This means that the master will continue to handle queries when one or more slaves performs the initial synchronisation.
· Replication is also non-blocking on the slave side. While the slave is performing the initial synchronisation, it can handle queries using the old version of the dataset.
Optionally, Redis supports persistence. Redis persistence allows saving data stored in Redis cache permanently to an allocated storage in Azure. You can also take snapshots and back up the data, which can reloaded in case of a failure.
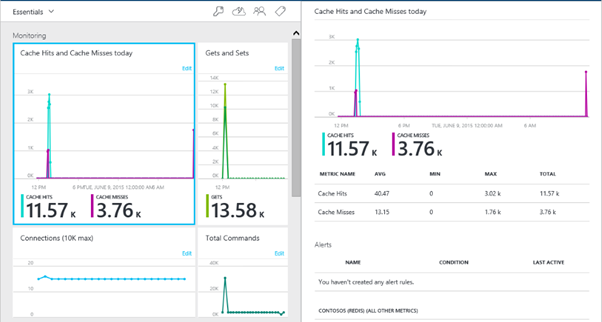
Lastly, Azure Redis comes with important monitoring capabilities that, when enabled, provide insights on the utilisation of the cache, in terms of cache hits and misses, used storage, etc.

Redis Insights in Azure
Connecting to Redis Cache in .NET
Once configured our Redis Cache instance in Azure, we define a unique URL to access it from a software application, and obtain a key for authentication. These two pieces of information are necessary to establish a connection to the Redis Cache engine from our application. Let’s build an ASP.NET MVC application then, which stores objects in Redis Cache.
A conventional option for storing the cache access credentials is the Web.config file of the MVC application. In the <appSettings> section, we can simply add a key:
<add key="CacheConnection" value="<instance-name>.redis.cache.windows.net,abortConnect=true,ssl=false,password=<instance-key>"/>
Parameter abortConnect is set to true, which means that the call will not succeed if a connection to the Azure Redis Cache cannot established. You may opt for a secured connection over HTTPS by setting the ssl parameter to true.
We also need to add a couple of NuGet packages to our projects:
· StackExchange.Redis is a .NET implementation of a Redis Cache client, which provides an easy-to-use interface to Redis commands.
· Newtonsoft.Json is the popular JSON framework for de/serialising objects to JSON and allowing storage in a Redis Cache database.

NuGet packages necessary to store .NET objects in Redis Cache
In its simplified implementation, the MVC application stores and retrieves objects from the Redis Cache by defining CRUD actions in a Controller. In this example, we are storing “expressions of interest” of a prospect student to attend a training program at a specific destination.
Our Interest model is defined as follows, with a few properties to enter the contact name, email address and country of origin, and properties for the request date, program and destination of choice.
public class Interest
{
public Guid Id { get; set; }
[DisplayName("Contact Name")]
public string ContactName { get; set; }
[DataType(DataType.EmailAddress)]
public string Email { get; set; }
public string Country { get; set; }
[DisplayName("Requested On")]
[DataType(DataType.Date)]
public DateTime RequestedOn { get; set; }
public string Program { get; set; }
public string Destination { get; set; }
}
The Interest model
We now add a new Interests Controller to the application, choosing to define read and write actions.

Adding an MVC 5 Controller with read/write actions
Do not use Entity Framework. Our storage is purely in Redis Cache. As we will see shortly, the approach for reading and writing data is very similar from a Controller perspective, with Index, Create, Edit and Delete actions defined around the Redis Cache client commands.
Connecting to the Redis Cache, then, is purely a matter of defining a connection using the connection string stored in the Web.config file. Our InterestsController class will have something like this:
public class InterestsController : Controller
{
static string cacheConnectionString = ConfigurationManager.AppSettings["CacheConnection"].ToString();
ConnectionMultiplexer connection = ConnectionMultiplexer.Connect(cacheConnectionString);
Now, this is far from being a good practice of defining a connection to any storage system, as hard-coding the ConnectionMultiplexer class inside the Controller’s code clearly creates a highly-coupled dependency. Ideally, we would inject this dependency using an IoC (Inversion of Control) library. However, for the sake of keeping things simple and straight in this example, the ConnectionMultiplexer class is all you need to obtain a connection to an instance of Redis Cache. The ConnectionMultiplexer, defined in the StackExchange.Redis namespace, works as a factory by exposing a static Connect method, and returning an instance of itself as a live connection to the defined Redis Cache.
A different approach to sharing a ConnectionMultiplexer instance in your application is to have a static property that returns a connected instance. This provides a thread-safe way to initialise only a single connected ConnectionMultiplexer instance, which can be shared in a singleton class. By masking the ConnectionMultiplexer behind a Lazy object, we also obtain just-in-time allocation of the connection when actually used by a Controller’s action.
static Lazy<ConnectionMultiplexer> lazyConnection = new Lazy<ConnectionMultiplexer>(() =>
{
return ConnectionMultiplexer.Connect(cacheConnectionString);
});
static ConnectionMultiplexer Connection => lazyConnection.Value;
Connection to Redis Cache in .NET
Reading from and Writing to a Redis Cache instance
Now that we have established a connection to a Redis Cache instance, we can access it in the read and write actions of the MVC Controller.
The Index action retrieves a list of all expressions of interests defined in the “Interests” data hash. A hash is an optimised data type in Redis for storing objects. First, we need to obtain a reference to the current database using the GetDatabase method of the Connection object; this method returns an instance of an object implementing the StackExcahange.Redis.IDatabase interface. Then, we can read from the “Interests” hash using the HashGetAll method of the IDatabase object. This method is a wrapper around the HGETALL Redis command. A list of all supported commands in available on the redis.io web site, but we don’t have to worry about it, as the StackExchange.Redis framework implements the necessary wrappers for us.
public ActionResult Index()
{
IDatabase cache = Connection.GetDatabase();
var interests = cache
.HashGetAll("Interests")
.Select(item => JsonConvert.DeserializeObject<Interest>(item.Value))
.OrderByDescending(i => i.RequestedOn)
.ToList();
return View(interests);
}
The Index action in the Interests Controller
Once obtained the list of objects defined in the “Interests” key, as an array of HashEntry objects, we need to deserialise their value to instances of the Interest model (objects are stored as JSON strings in the hash). The model, a list of Interest objects ordered by date of request with the most recent showing first, is then passed to the view for display on screen.
Adding a new object to the cache requires a push of the JSON-serialised object to the Redis Cache hash. In the Create action, once obtained a reference to the cache database from the active connection, the HashSetAsync method will add the element to the hash. The name of the hash entry is a newly generated Guid, which identifies the entry uniquely, and the value is the JSON serialised version of the Interest object. Also, please note that we are using the asynchronous version of this method, for returning control to the UI immediately whilst the set operation is completed in background. The Create action, then, implements the async/await pattern.
[HttpPost]
public async Task<ActionResult> Create(Interest interest)
{
if (ModelState.IsValid)
{
IDatabase cache = Connection.GetDatabase();
interest.Id = Guid.NewGuid();
HashEntry entry = new HashEntry(
interest.Id.ToString(),
JsonConvert.SerializeObject(interest));
await cache.HashSetAsync("Interests", new[] { entry });
return RedirectToAction("Index");
}
return View();
}
The Create action in the Interests Controller
Modifying an object in the cache requires setting the serialised object at the specified hash name, calling the HashSetAsync method again. This is implemented in the Edit action, using the async method as seen for the Create action.
[HttpPost]
public async Task<ActionResult> Edit(string id, Interest interest)
{
if (ModelState.IsValid)
{
IDatabase cache = Connection.GetDatabase();
HashEntry entry = new HashEntry(
id,
JsonConvert.SerializeObject(interest));
await cache.HashSetAsync("Interests", new[] { entry });
return RedirectToAction("Index");
}
ViewBag.Program = this.Programs;
ViewBag.Destination = this.Destinations;
return View(interest);
}
The Edit action in the Interests Controller
Lastly, removing an item from a hash is as simple as removing it with the HashDeleteAsync method. This is implemented in the Delete action.
[HttpPost]
public async Task<ActionResult> Delete(string id)
{
IDatabase cache = Connection.GetDatabase();
await cache. HashDeleteAsync("Interests", id);
return RedirectToAction("Index");
}
The Delete action in the Interests Controller
The complete source code is available free to download from CodePlex.
Cache Design Patterns
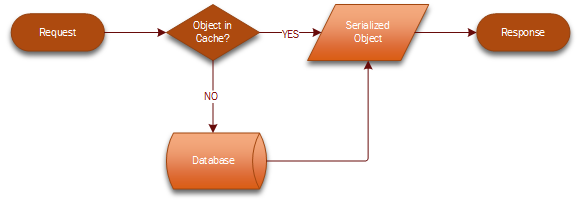
A cache typically contains objects that are used most frequently, in order to serve them back to the client without the typical overhead of retrieving information from a persistent storage, like a database. A typical workflow for reading objects from a cache consists of the following steps:
1. A request to the object is initiated by the client application to the server.
2. The server checks whether the object is already available in cache, and if so, returns the object immediately to the client as part of its response.
3. If not, the object is retrieved from the persistent storage, and then returned to the client as per step 2.
In both cases, the object is serialized for submission over the network. At cache level, this object may already be stored in serialized format, to optimise the retrieval process.

Level 1 Cache Workflow
Please note that this is an intentionally simplified process; additional complexity may be introduced by checking for cache expiration based on time, dependent resources, least used object, etc.
This configuration is typically called Level 1 Cache, as it contains one level of cache only. Level 1 caches are normally used for Session and Application state management. Although effective, this approach is not optimal when dealing with applications that move large quantities of data over multiple geographies, which is the scenario that we want to optimise. First of all, large data requires large cache to be effective, which in turn is memory intensive, thus requiring expensive servers with a big allocation of volatile memory. In addition, syncing nodes across regions implies large data transfers, which, again, is expensive and introduces delays in availability of the information in the subordinate nodes.
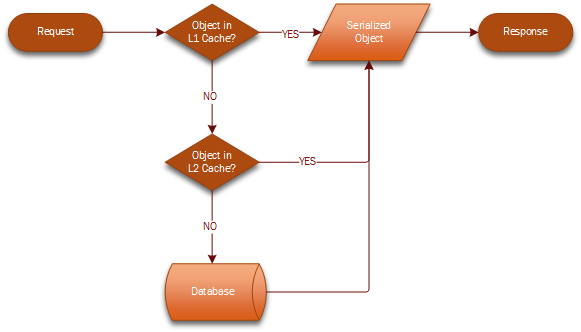
A more efficient approach to caching objects in data-intensive applications is to introduce a Level 2 Cache architecture, with a first cache smaller in size, that contains the most frequently accessed objects in the larger dataset, and a second cache, larger in size, with the remaining objects. When the object is not found in the first level cache, it is retrieved from the second level, and eventually refreshed periodically from the persistent storage. In a geographically distributed environment, the L1 caches are synced across data centres, and the L2 cache resides on the master server.

Level 2 Cache Workflow
The challenge, then, is in defining what goes in the L1 and what in the L2 cache, and with what frequency the regional nodes should be synced to optimise the performance and storage of the cache instances. Performance of a cache is measured as “hit ratio” and “miss ratio”. The hit ratio is the fraction of accesses which are a hit (object found in cache) over the all of requests. The miss ratio is the fraction of accesses which are a miss (object not found in cache), or the remaining of the hit ratio to 100%.
With a mathematical formula, you can express the hit ration as:

And the miss ratio as:
![]()
To optimise the performance of a cache, you want to increase the hit ratio and decrease the miss ratio. Irrespective of adopting a Level 1 or Level 2 cache architecture, there are different techniques for improving a cache performance, by pre-fetching data in cache on a regular basis, to just-in-time caching, or allocation of most used objects based on counters.
In the second part of this article, we’ll get familiar with a prediction technique based on a Machine Learning algorithm called “Demand Estimation”. Based on patterns of usage of objects, the “Demand Estimation” algorithm predicts the likelihood that an object is going to be used at a specific time, and therefore it can be allocated in cache before a request is submitted, to increase the chance of a hit.
We’ll focus on the implementation of the “Demand Estimation” Machine Learning algorithm in the context of web applications, in the next article, observing what web pages are typically accessed, and populating the cache with the algorithm’s outcome.

Project Name: AzureRedis
When creating an MVC application with Entity Framework, it is possible to set default values for most properties in a model using the DefaultValue attribute. However, no much flexibility is offered for a DateTime property. This article presents a custom validation attribute for DateTime types that accepts different formats for defining the default value of the property.
How I built a social sharing component for my own web site and added a secured geo-located audit trail. Step by step, let’s analyse technologies and source code for developing this component.
How I built a social sharing component for my own web site and added a secured geo-located audit trail. Step by step, let’s analyse technologies and source code for developing this component.
Build effective SharePoint forms with Nintex that are accessible anywhere, at any time, and on any device. You built the workflows, you built the forms, now make them mobile.
With just over 3 weeks to go to Europe's largest gathering of SharePoint & Office 365 professionals, take a look at these tips that will help you get the most out of ESPC16…
Learn how to write code to perform basic operations with the SharePoint 2013 .NET Framework client-side object model (CSOM), and build an ASP.NET MVC application that retrieves information from a SharePoint server.
What are the synergies and differences of the roles of a Chief Information Officer and a Chief Technology Officer? An open conversation about two roles with one mission…
Whether you are a software developer, tester, administrator or analyst, this article can help you master different types of UI testing of an MVC application, by using Visual Studio for creating coded UI test suites that can be automated for continuous execution.
Different formats and standards exist for describing geographical coordinates in GIS systems and applications. This article explains how to convert between the most used formats, presenting a working library written in C#.
With the release of the Nintex Mobile apps, SharePoint users can now optimise their experience across popular mobile devices and platforms.
Performance Testing is an essential part of software testing, with the specific goal of determining how a system performs in terms of responsiveness and stability under a particular workload. In this series of posts we’ll define and execute a good strategy for testing performance of an application using Visual Studio.
Can you generate two identical GUIDs? Would the world end if two GUIDs collide? How long does it take to generate a duplicate GUID and would we be still here when the result is found?
A design paper about implementing GIS-based services for a local Council in Dynamics CRM, structuring address data, and delivering location services in the form of WebAPI endpoints via an Enterprise Service Bus.
All teams are groups but not all groups are teams. What defines a group and what a team? When do we need one over the other one?
Learning to give and receive constructive feedback is an essential part of learning, growing, improving and achieving our goals.
Have you ever wanted to see your iPhone or iPad on a larger screen? Play games, watch movies, demo apps or present to your computer from your iPhone or iPad. Reflector mirrors iOS devices on big screens wirelessly using iOS built-in AirPlay mirroring.
Build workflow applications in SharePoint that can be accessed on mobile devices using the Nintex solution for business process mobilization.
Have you ever desired to have in your code a way to order a sequence of strings in the same way as Windows does for files whose name contains a mix of letters and numbers? Natural string sorting is not natively supported in .NET but can be easily implemented by specialising a string comparer and adding a few extensions to the enumerable string collection.
How can an organisation optimise its sales channels and product targeting by building a 365-degree view of its customers in Dynamics CRM? The answer, and topic of this article, is with the help of Azure IoT and Machine Learning services!
What it takes to be a great Software Development Manager? I have been building software for the last 15 years and have collected a few stories and experiences to share. Some I have used as questions when interviewing candidates. In 11 points, this is my story to date.
Practical code examples of ASP.NET MVC applications that connect to a SharePoint Server and comply with the SOLID principles.
Outsourcing may look financially attractive, but working with companies in far-off lands introduces challenges that, if not considered properly, can drive any project to failure. Let’s explore some common pitfalls when working with offshore partners and a common-sense approach to work around them.
Customers expect a modern approach to advertising. Digital advertising can leverage evolving technology to provide just-in-time, just-at-the-right-place promotions.
There is an urban myth in the programmers’ community that the so called “Yoda’s syntax” performs better when checking an object for nullity. Let's demystify it...
